New kiln and non uniform glass thickness

This is the main board for discussing general techniques, tools, and processes for fusing, slumping, and related kiln-forming activities.

Moderators: Brad Walker, Tony Smith

Post Reply
Victoria Balva
Posts: 17
Joined: Thu Sep 03, 2009 10:18 am

New kiln and non uniform glass thickness

Post by Victoria Balva »

Recently I got a new custom built belt type kiln with inner space 48 by 96 by 13, 600 V with master vent system. We set up a set of large mullite extruded shelves 46 by 42 inches approximately 1 inch from the kiln floor. The glass is placed about 7 inches from the heat sensor

I am working on the project to fuse 5 45 by 36 panels with glass thickness from 1/2 to 2 inches. System 96. The glass is fired in 2 sessions.

1 session is to form seamless full fuse slabs .
Ramp 300 F, T 1000 F
Ramp full, T 1460 F, hold 17 min
Ramp Full, T 1000 F
Ramp 100 F, T 960 F, hold 2 h
Ramp 100 F, T 800 F
Ramp 180 F, T 700 F
Ramp 600 F, T 150 F

the image attached

Image

Second firing is done on the previously fused base. The strips of colored glass and large shanks of casting rocks are laid on the base. 3 panels out of 7 cracked on the way of heating up. Here is a schedule
Ramp 70 F, T 300 F
Ramp 80 F, T 1000 F
Ramp Full, T 1420 F
Ramp Full, T 960 F, vent ON
Ramp Full, T 950 F, Hold 8 h
Ramp 8 F, T 800 F
Ramp 16 F, T 700 F
Ramp 65 F, T 100 F
I think this schedule is quite conservative, but apparently the problem indicates something is not right. I lowered heating up to 60/70 still the same result. Panels are fired by 2 peaces and only one in a set has the crack

Image

Should I lower heating up temperature more ?
Maybe shelves layout should be changed or lifted up closer to heat sensor?
What is the range of temperature to reheat the glass with non uniform thickness?
Is the kiln too powerful for this work?
Glass ceilings www.crowndome.com
Contemporary glass www.artisticlinestudio.com
Morganica
Posts: 1079
Joined: Mon May 19, 2003 6:19 pm
Location: Portland, OR
Contact:

Re: New kiln and non uniform glass thickness

Post by Morganica »

Holy cow. When you build a new kiln, you really go to town! Congratulations!

Many questions. Where is the crack and how is it shaped? Does it follow, or appear to originate from, any of those colored pieces? In particular, the sharper-edged or taller tack-fused pieces? Is there any consistency with which colors/pieces crack?

A 2-inch thick slab of glass with tack-fused decoration on top might need a schedule typically used for glass as thick as 6 inches. Your schedules are very conservative, but if you're getting cracks around a tacked component, they still might not be conservative enough.

Are the cracks occurring at the same position in the kiln each time, or in different spots? This is a new (and I'd imagine much larger) kiln, so if you haven't checked the kiln for hotspots/coldspots, that's one place to look. I have a kiln with a much smaller air volume and I periodically fire with four thermocouples in varying positions, making sure I understand the heating profile of the kiln--that might be something to think about here. There's a tech sheet on Bullseye's website, "Know your kiln" or something that like, which could be very helpful here. It would be especially important to understand if automatic venting/air movement is part of your firing strategy.
Cynthia Morgan
Marketeer, Webbist, Glassist
http://www.morganica.com/bloggery
http://www.cynthiamorgan.com

"I wrote, therefore I was." (me)
Bert Weiss
Posts: 2339
Joined: Tue Mar 11, 2003 12:06 am
Location: Chatham NH
Contact:

Re: New kiln and non uniform glass thickness

Post by Bert Weiss »

It is hard to tell from your picture, but if any glass spans the cracks between the shelves, it will not anneal. You would have to cement the shelves together.

How many zones are there? (how many thermocouples?)
Bert

Bert Weiss Art Glass*
http://www.customartglass.com
Furniture Lighting Sculpture Tableware
Architectural Commissions
Victoria Balva
Posts: 17
Joined: Thu Sep 03, 2009 10:18 am

Re: New kiln and non uniform glass thickness

Post by Victoria Balva »

Morganica wrote:Congratulations!
Thank you! Long waited, badly needed, finally installed
Morganica wrote:Where is the crack and how is it shaped? Does it follow, or appear to originate from, any of those colored pieces? In particular, the sharper-edged or taller tack-fused pieces? Is there any consistency with which colors/pieces crack?
Now with the help from other people I really think that the problem is in first firing cool down. 600 dph for 3/8 inch slab is too fast. The cracks have various shapes, one of them - S, another Y. Another panel just exploded from one point. Interesting thing about this one is that it was the only panel fired single. it took only half of the shelf. The desired effects were not reached comparatively to firings were 2 panels were fired at once. Plus it was broken badly during initial heating.

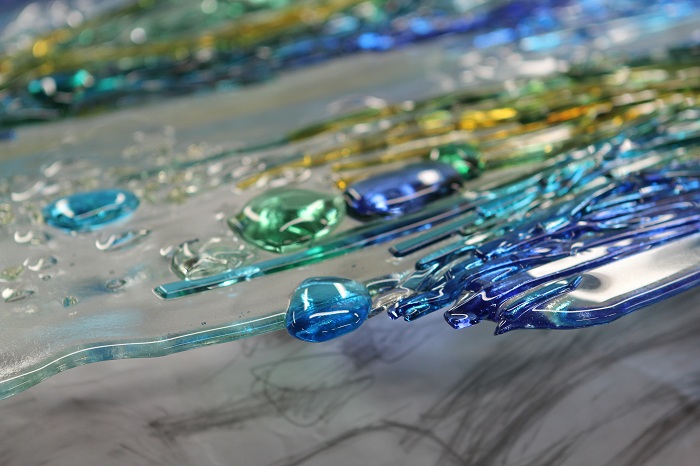
All colours are transparent and do not seem to be a problem. I did a lot of this style panels in smaller size and was always OK. The transition to larger size panels is not easy - too many things to take into account
Morganica wrote:A 2-inch thick slab of glass with tack-fused decoration on top might need a schedule typically used for glass as thick as 6 inches. Your schedules are very conservative, but if you're getting cracks around a tacked component, they still might not be conservative enough.
Not exactly, half inch slab with layers of strips and casting rocks , additional 1-1.5 inch. After final firing the overall thickness very from 1/4 to 2 inches. It is not exactly tack fuse, I would say - dimensional fuse
Morganica wrote:Are the cracks occurring at the same position in the kiln each time, or in different spots?
All different sports
Morganica wrote:This is a new (and I'd imagine much larger) kiln, so if you haven't checked the kiln for hotspots/coldspots, that's one place to look.
It was checked with cones. Seemed to be OK, but now we want to buy a few more termo couples
Morganica wrote: I have a kiln with a much smaller air volume and I periodically fire with four thermocouples in varying positions, making sure I understand the heating profile of the kiln--that might be something to think about here. There's a tech sheet on Bullseye's website, "Know your kiln" or something that like, which could be very helpful here. It would be especially important to understand if automatic venting/air movement is part of your firing strategy.
Thank you for the tip. I think that problem may be in distant position of glass from heat controller that does not reflect the actual temperatures on the shelf??? Bullseye's recommends 4 inches from the floor. I would like to use vent more, because I want air to circulate in the kiln to reach better results. Nicolas Weinstein http://www.nikolas.net/ mentions in his lecture at Corning glass museum that it is all about air circulation around the peace and he works with way bigger peaces.
Glass ceilings www.crowndome.com
Contemporary glass www.artisticlinestudio.com
Victoria Balva
Posts: 17
Joined: Thu Sep 03, 2009 10:18 am

Re: New kiln and non uniform glass thickness

Post by Victoria Balva »

Bert Weiss wrote:It is hard to tell from your picture, but if any glass spans the cracks between the shelves, it will not anneal. You would have to cement the shelves together.

How many zones are there? (how many thermocouples?)
There is only 1 termocouple installed by manufacturer. Gaps are very small and before each firing we try to fill it with cement, lava cloth and kiln wash. On the working temperature shelves expand ... so they move creating a tiny gap after firing. Yes that may be another brick in the set of problems. How to cement shelves together?
Glass ceilings www.crowndome.com
Contemporary glass www.artisticlinestudio.com
Victoria Balva
Posts: 17
Joined: Thu Sep 03, 2009 10:18 am

Re: New kiln and non uniform glass thickness

Post by Victoria Balva »

I want to refire 2 panels (manor changes to the design layout) . What would be safe T to reheat the glass? Here is the link to my facebook album with this projecthttps://www.facebook.com/photo.php?fbid ... =3&theater

Does anybody has experience working with Vent Master?
Glass ceilings www.crowndome.com
Contemporary glass www.artisticlinestudio.com
Morganica
Posts: 1079
Joined: Mon May 19, 2003 6:19 pm
Location: Portland, OR
Contact:

Re: New kiln and non uniform glass thickness

Post by Morganica »

Victoria Balva wrote:
Bert Weiss wrote:It is hard to tell from your picture, but if any glass spans the cracks between the shelves, it will not anneal. You would have to cement the shelves together.

How many zones are there? (how many thermocouples?)
There is only 1 termocouple installed by manufacturer. Gaps are very small and before each firing we try to fill it with cement, lava cloth and kiln wash. On the working temperature shelves expand ... so they move creating a tiny gap after firing. Yes that may be another brick in the set of problems. How to cement shelves together?
I think you'd be better off creating a sandbed or a shelf/subshelf system. Take a look at this technote from Bullseye: http://www.bullseyeglass.com/methods-id ... -kiln.html I hate to recommend it when you're not using their glass, but it's good info.

However, it looked as though your pieces didn't overlap the shelves, i.e., that one big shelf contains one big piece. Is that not the case? The measurements implied that the pieces weren't that far off square at 45x36.

If the photos are any indication, Victoria, those are pretty dimensional tack-fuses, which means you've got a lot of variations in thickness. The tack-fuses will pull away from the body of the slab, creating a lot of stress points at the joins. If you can see a sharp change in angle between the base glass and the decoration, as indicated here by the red arrows, then you've got a piece of glass that's going to be contracting away from the base glass during cooling:
tackfuse.jpg
The size of the piece will exacerbate things, since you've simply got more joins to deal with over a bigger area. In addition, if the glass is also positioned over a bridge between two shelves, there's less insulation under the shelf and the glass will be cooling slightly faster, adding to the trouble.

I'd be looking at an anneal soak of more like 20 hours, and a cooldown closer to 1dph to 800, 2dph to 700, 4dph to 500, 10dph to room temp. One way to see, since this is all transparent glass, is to try a schedule closer to that and look at the join areas under the polarimeter. I think you might see the faster schedule showing rainbows.

The alternative would be to hold the glass at process temperatures a bit longer, and make the glass a little flatter going into the anneal.
Cynthia Morgan
Marketeer, Webbist, Glassist
http://www.morganica.com/bloggery
http://www.cynthiamorgan.com

"I wrote, therefore I was." (me)
Victoria Balva
Posts: 17
Joined: Thu Sep 03, 2009 10:18 am

Re: New kiln and non uniform glass thickness

Post by Victoria Balva »

Cynthia, Thank you a lot for all your thoughts. They are very valuable for me. Bullseys notes are very important. Large scale in art glass is comparatively new direction and those companies that work with art glass (especially in Canada) keep it as a trade secret. Not a lot of information available plus difficulties to adjust to your own goals

My big shelf is combined of 4 different size peaces with the largest one 30 by 60 inches and there is no sub shelf system. I will add sub shelf in the nearest future. Should I lift the shelf 4 inches from the floor as suggested by bullseye??? The peaces have a free shape but very close to 36 by 48. They also have voids

Since I am planning to refire all panels on the shelf with added subshelf or sand bed... I am thinking to add a few more minutes to working temperature slightly to flatten the glass (my goal is to leave the texture as much as possible, but I am willing to sacrifice a little bit to get better results in annealing). Five panels, 3 firings

So... Here are my thoughts on the schedule

R 40, T 100, H 0
R 999, T 1420 , H extra mins
R 999, T 960, H 0, Vent ON
R 60, T 950, H 12 h
R 2, T 800, H 0
R 4, T 700, H 0
R 8, T 500, H 0
R 20, T 100, H 0

I just want to add that when I did first final firing the panels were on a hold for 9 min and even with textured side they were much more smoother. No sign of stress in glass. I did not like the layout of strips and I wanted more texture so I did new panels and they were on a hold for 6 min (this is what I posted). and the last panels were on a hold for 5 minutes. That is the most visually successful panels and the most difficult to anneal as I can see now
Glass ceilings www.crowndome.com
Contemporary glass www.artisticlinestudio.com
Bert Weiss
Posts: 2339
Joined: Tue Mar 11, 2003 12:06 am
Location: Chatham NH
Contact:

Re: New kiln and non uniform glass thickness

Post by Bert Weiss »

I use a large bell kiln in my studio. 90% of the time, I fire directly on the floor covered with either powdered blanket or a sanbed that sits on top of the blanket. I use Unifrax 1/4" durablanket. It is a fantastic material that is really quite durable. Over the years, I have developed an arsenal of powders I use for different effects. Finely ground alumina hydrate is the most important one, used in many mixtures as the primary separator. The other 10% I use either drop molds, bowl molds, or small kiln shelves. I have successfully annealed 36mm thick glass fired on the floor of my kiln. I never tried anything thicker. There is a point at which you will lose more heat through the floor than you can replace through the roof elements. When that happens annealing becomes impossible. I don't know where that point is for my kiln.

I have used large bell kilns with a single thermocouple, and they have worked for me. However, I would never in a million years design a kiln that way. The middle of the kiln always wants to be hotter than the ends. Each end has 3 sides with cold faces and one hot side. The middle has 2 cold sides and 2 hot sides. Consequently it is always hotter, unless the kiln has 3 zones with their own thermocouples and relays. I believe it is less expensive to use the smaller relays required for a third of the power, than it is to use one great big one. So, unless you have some way of making convection currents, the middle is hotter in your kiln, especially during the anneal cycle.

Once, I tried to fire on multiple hard kiln shelves. The glass cracked right at the space between the shelves. It did not anneal because of the abutted shelves. I routinely fire on raised fiber board shelves that are abutted, and covered with 1/4" blanket. The blanket is enough of a barrier to prevent problems. There are refractory cements that might work to mortar multiple shelves in to one. I never tried this.

I use one basic test to know about my annealing. If I can drill the glass or saw the glass, and nothing bad happens, it is properly annealed. I do this all the time, so I am confident about my processes. Today, I waterjetted a 30mm slab, 84" long. Slick...
Bert

Bert Weiss Art Glass*
http://www.customartglass.com
Furniture Lighting Sculpture Tableware
Architectural Commissions
rosanna gusler
Posts: 730
Joined: Mon Mar 10, 2003 2:22 pm
Location: wanchese north carolina
Contact:

Re: New kiln and non uniform glass thickness

Post by rosanna gusler »

hold at 1000f for 20 min or so on your ramp up. the glass is cooler than the air around the thermocouple. rosanna
artist, owner of wanchese art studio, marine finisher
Victoria Balva
Posts: 17
Joined: Thu Sep 03, 2009 10:18 am

Re: New kiln and non uniform glass thickness

Post by Victoria Balva »

Just little report on the final firing. The glass was reheated to 1410 and even quite short soak time (3 min) made texture much more smoother and glass thickness decreased to a maximum of 1 inch. The panels are annealed nicely. Usually I try to keep glass edges sharper but this time new smother texture in this particular project looks very nice. Nothing to regret

R 25, T 1000, H 0
R 999, T 1410 , H extra mins
R 999, T 960, H 0, Vent ON
R 60, T 950, H 12 h
R 4, T 800, H 0
R 7, T 700, H 0
R 8, T 500, H 0
R 25, T 100, H 0
Attachments
IMG_7396 copy sm.jpg
IMG_7401 copy sm.jpg
IMG_7394 copy sm.jpg
Glass ceilings www.crowndome.com
Contemporary glass www.artisticlinestudio.com
Tammy Macdonald
Posts: 15
Joined: Tue Jun 18, 2013 1:45 pm
Location: Texas

Re: New kiln and non uniform glass thickness

Post by Tammy Macdonald »

beautiful colors and texture!
Victoria Balva
Posts: 17
Joined: Thu Sep 03, 2009 10:18 am

Re: New kiln and non uniform glass thickness

Post by Victoria Balva »

I need help .... Our kiln in combination with current shelves system seems to bring more problems than I expected. We set up a 6 point monitoring system - the temperature inside of the shelf was around 150 F lower during firing up and 50 F lower during hold comparatively to t/c installed above the glass. The rest 5 showed uniformed temperature during all firing. It takes a lot of time to cool kiln to room temperature. So the problem comes from the shelf.

What can I do to get that glass fired?

We are considering to install heating elements below the shelf. Before we do that what else can I do to approve the performance of the kiln?

How send bed can improve the firing?

Can we do the firing on floor with fiber blanket? Any help
Glass ceilings www.crowndome.com
Contemporary glass www.artisticlinestudio.com
Bert Weiss
Posts: 2339
Joined: Tue Mar 11, 2003 12:06 am
Location: Chatham NH
Contact:

Re: New kiln and non uniform glass thickness

Post by Bert Weiss »

Victoria Balva wrote:I need help .... Our kiln in combination with current shelves system seems to bring more problems than I expected. We set up a 6 point monitoring system - the temperature inside of the shelf was around 150 F lower during firing up and 50 F lower during hold comparatively to t/c installed above the glass. The rest 5 showed uniformed temperature during all firing. It takes a lot of time to cool kiln to room temperature. So the problem comes from the shelf.

What can I do to get that glass fired?

We are considering to install heating elements below the shelf. Before we do that what else can I do to approve the performance of the kiln?

How send bed can improve the firing?

Can we do the firing on floor with fiber blanket? Any help
Victoria, the problem may be much easier to solve than you are making it. We control the air, which is quite different from the glass itself. So the first thing you need to evaluate is heatwork. Is the glass doing what you want it to do? Then you have to get a good anneal. During the heatup, the glass is cooler than the air. During the anneal, the glass is hotter than the air. All that really matters is that the glass falls through the anneal cycle in a manner that gets the job done. The entire mass of glass needs to be within 5ºC while the glass is inside the annealing range, and then fall at an appropriate rate to not introduce any new stresses. You can do all of that without really knowing what the real temperatures are at any given moment.

Sandbeds yield a controllable texture, can be quite large, and be made flat. I keep a layer of 1/4" (6mm) blanket on my floor. Then I sift the sand on to make a 10mm thick sandbed. When I am done with the sandbed, I scoop it up and sift it back in to my barrel. Usually, I fire directly on the blanket. I get a 48" wide roll of blanket, which yields a great firing surface for me. For the initial firing, I put quite a bit of alumina hydrate sifted on the blanket. Once this has coated the fiber, you can remove it, or keep it in place. After the first firing, the blanket compresses quite a bit. I can leave a layer of blanket in place for quite a long time. It is fairly easy to patch rips and dings.
Bert

Bert Weiss Art Glass*
http://www.customartglass.com
Furniture Lighting Sculpture Tableware
Architectural Commissions
Victoria Balva
Posts: 17
Joined: Thu Sep 03, 2009 10:18 am

Re: New kiln and non uniform glass thickness

Post by Victoria Balva »

I am just having bad luck.... It is good to have possibility to review actual firing after. Looking through graphics I noticed that during 3 hours temperature dropped from 850 to 700 after annealing. That was something wrong with the program or computer, we noticed that on Monday morning when we came to the studio but we were sure that was very short and reprogrammed computer to continue. Now I see that was the moment when stress was introduced into glass

Lesson learnt - to re heat glass to annealing point if any doubt and to complete firing without interruption.

Bert, what is the maximum thickness of glass that you are sure you can anneal in your kiln without heating elements in the bottom?
Glass ceilings www.crowndome.com
Contemporary glass www.artisticlinestudio.com
Bert Weiss
Posts: 2339
Joined: Tue Mar 11, 2003 12:06 am
Location: Chatham NH
Contact:

Re: New kiln and non uniform glass thickness

Post by Bert Weiss »

Victoria Balva wrote:Bert, what is the maximum thickness of glass that you are sure you can anneal in your kiln without heating elements in the bottom?
Victoria

Good question. I have annealed 36mm and cut it with a glass cutter. I do not know the max in my kiln, as I have never had occasion to work thicker than that. There is a point at which more heat is being lost through the floor than the elements can replace. When this happens, annealing becomes impossible. If you have elements in the floor, it will considerably speed up the ability to anneal. Annealing happens when the entire mass of glass is within 5ºC inside the annealing range. Then you need to cool at a rate that does not introduce enough stress to make the glass crack. The actual anneal may happen in 15 seconds, but it can take hours to make that happen.

BTW, my kiln floor is 5" of WW2 era insulating fire brick covered with several layers of blankets and boards. I tend to just keep putting fresh layers in, rather than removing them. I moved this kiln to my present shop about 17 years ago. My kiln looks a lot like yours, only my floor is stationary and I move the bell back and forth. As a user and designer of bell kilns, I would never move the floor. However every single bell kiln I have seen made by anybody but me, moves the floor? I find that, in a word, stupid...
Bert

Bert Weiss Art Glass*
http://www.customartglass.com
Furniture Lighting Sculpture Tableware
Architectural Commissions
Post Reply