Magless 2005 Showcase
Section Three – final 35 participants
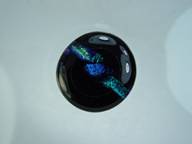
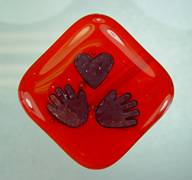
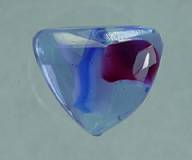
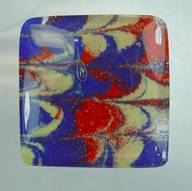
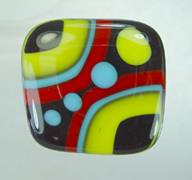
71 Elizabeth
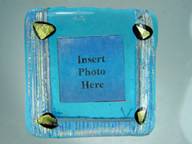 Picture
frame "how to"
Picture
frame "how to"
I cut a 2" x 2"
piece of glass to be the back, then a 2" x 2" piece of clear glass
for the top.
Next I cut three pieces
of glass to be the perimeter of the frame and sandwiched them between the top
and back. I placed fiber paper where I
wanted the picture to go and fired away.
I heated my baby kiln to 1450 degrees and then immediately began the
ramp down process. When the kiln was
completely cooled down I took the mini frames out and had to grind the rough
edges of the clear glass where the fiber paper protruded.
 Cut 1-1/2” x 1-1/2”
squares of Bullseye glass in assorted opaque colors.
Cut 1-1/2” x 1-1/2”
squares of Bullseye glass in assorted opaque colors.
Cut strips of Bullseye
rolled edges, approximately 1-1/4”, and cut these into pieces 1-1/4” wide.
Place these on top of the larger squares, contrasting colors, aligning top
edges and centering from side to side. Fire on Thinfire as follows:
2400°/hr to
1425°, hold 10 min.
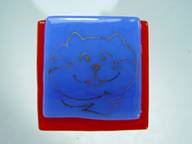
Decorate with Duncan gold, using a fine
line Kemper pen. Take 2 Excedrin for shoulder pain (did 75 cat & dog
drawings in one sitting!) and invite kitten to snuggle into my shoulder
(providing warmth, vibration, soothing sounds and paw-kneading massage!)
Fire again on
Thinfire as follows:
2400°/hr to
1350°, hold 10 min.
This was not a
new technique for me, as I had made these before. I probably would not want to
do that many drawings again in one session, although doing it all at once meant
only one session of enduring the stink of the gold. And Harley the kitten put
in a long shift, too…she stayed snuggled up all night! My shoulder feels fine
this morning. I highly recommend this therapy.
 I cut white circles from regular thickness BE
glass – ground them & washed them well, including the edges. Then I
laid an egg-shaped stiff paper cut-out on the white circle leaving only a
little of the white circle exposed. I sprinkled the first color frit on
this bottom crescent – gray-blue frit (# to be provided later). I then
moved the egg shape up exposing the middle part of the circle. I
sprinkled cornflower blue frit (# to be provided later) on this exposed area,
being sure to sprinkle so that more frit hit the egg-shape barrier, which meant
that the frit hit the exposed part of the white circle with a minimal overlap
on the gray-blue frit that had been sprinkled below it. Next, I
removed the egg shaped barrier and sprinkled the third color of frit (# to be
provided later) over the exposed top part of the white circle. The
circles now went into the kiln, and the first firing was a tack-fuse.
I cut white circles from regular thickness BE
glass – ground them & washed them well, including the edges. Then I
laid an egg-shaped stiff paper cut-out on the white circle leaving only a
little of the white circle exposed. I sprinkled the first color frit on
this bottom crescent – gray-blue frit (# to be provided later). I then
moved the egg shape up exposing the middle part of the circle. I
sprinkled cornflower blue frit (# to be provided later) on this exposed area,
being sure to sprinkle so that more frit hit the egg-shape barrier, which meant
that the frit hit the exposed part of the white circle with a minimal overlap
on the gray-blue frit that had been sprinkled below it. Next, I
removed the egg shaped barrier and sprinkled the third color of frit (# to be
provided later) over the exposed top part of the white circle. The
circles now went into the kiln, and the first firing was a tack-fuse.
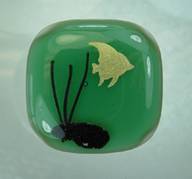
I cut small bird shapes out of thin copper sheet. Sorry, I don’t know
what gauge. I put these small birds into a heavy book to flatten for a
few days. Then I placed a bird onto each prepared circle (described
above). I capped this with clear 90 coe glass – mostly regular thickness
glass, but a few are made with a BE thin clear on top. I tried to use up
all the small pieces of clear laying around my shop. These then went in
for a full fuse. After I had completed around half of my maglesses, I
tried a bubble squeeze firing schedule. This seemed to work much better.
What I Learned:
I learned that the smaller the copper inclusion the fewer bubbles result in the
finished magless. Last year I cut out small coyote copper inclusions.
These incurred more bubbles than the small bird-shaped inclusions I used
this year. The bubble-squeeze firing schedule also helped to reduce the
number & size of bubbles in my maglesses this year. But I did still
get some bubbles, but not in every magless.
An interesting thing happened when my magnets overcooked during the first
tack-fuse firing. This happened to 2 batches, and I don’t know why
because I have an add-on controller. Two batches came out looking like
they had gone through a full fuse instead of a tack fuse. I treated these
as I did them all – copper bird inclusion and clear cap. But after the
2nd firing, these maglesses came out looking like they had a white halo around
the outside of the whole magnet. This is very interesting to me because
the frit was sprinkled to the edges of all the maglesses, and the clear cap was
actually much bigger than these 40 blanks. Even though I don’t know why
the white halo appeared, I like the effect. But I like them without the
halo, as well. And I couldn’t decide whether I liked the birds flying
east or west best, so there are both.
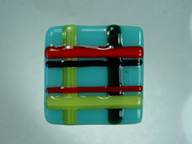 "Mad About
Plaid"
"Mad About
Plaid"
1.5"
squares, Spectrum white opal base, Spectrum pastel opal top, system 96
stringers and noodles. Each square was assembled and fired individually rather
than assembling a larger piece, firing, and cutting. Fired to 1250 and held for
30 minutes, then fired to 1350 and held for 10-12 minutes.
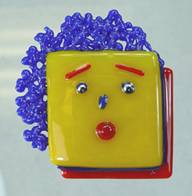 DESCRIPTION
Glass Used: Bullseye
0124 Red – Sheet Glass, Med Frit and Stringers
0220 Sunflower Yellow – Sheet Glass
0147 Deep Cobalt Blue – Med Frit and Stringers
0120 Yellow Stringers
Silver pen and Sharpie to define eyes
FIRING SCHEDULE
Seg. Ramp Rate Temp Hold
1 500
1,000 10m
2 500
1,430 10m
3 999 960
10m
4 200 700
10m
5 999 100
10m
Shelf – Mullite
Shelf Release – ThinFire
Notes:
Red and yellow squares off set and then decorated with Red, Yellow
and Blue frit and stingers to make a clown face. Eyes further defined with silver metal pen
and sharpie. Fired to 1,430 to retain texture
of eyes and hair.
 Copper dragonflies were punched from 36 ga copper tooling foil.
These were flattened by hand then rolled with a dowel rod on a piece of glass to
completely flatten them. The top surface was sanded using a Scotchbrite
greenware file from my ceramic tools. Blue masking tape was attached to scrap
cardboard sticky side up. Sanded dragonfly shapes were stuck to masking tape
and airbrushed lightly with Unique Glass Colors clear. Painted dragonflies were
stuck to thin clear square using glass fusing glue under tip of one wing only.
All glass was Spectrum Sys 96 cut 1 1/2 " square. Each magless used one
square white 3mm and two squares thin clear. Blue bubble paint is 100 parts P
25 ceramic frit, 7.5 parts black copper oxide with 2% CMC gum in water
solution. White squares were stuck to blue masking tape on scrap cardboard and
airbrushed with blue bubble paint. Overspray was wiped from edges of white squares
using a paper towel. Each magless was stacked with the painted white layer on
the bottom, thin clear with dragonfly attached, then thin clear as cap. Magless
were fired to full fuse on kiln washed shelf until edges rounded nicely. Minor
points on the corners were removed by sanding lightly on well worn 120 grit
1" X 30’’ belt sander.
Copper dragonflies were punched from 36 ga copper tooling foil.
These were flattened by hand then rolled with a dowel rod on a piece of glass to
completely flatten them. The top surface was sanded using a Scotchbrite
greenware file from my ceramic tools. Blue masking tape was attached to scrap
cardboard sticky side up. Sanded dragonfly shapes were stuck to masking tape
and airbrushed lightly with Unique Glass Colors clear. Painted dragonflies were
stuck to thin clear square using glass fusing glue under tip of one wing only.
All glass was Spectrum Sys 96 cut 1 1/2 " square. Each magless used one
square white 3mm and two squares thin clear. Blue bubble paint is 100 parts P
25 ceramic frit, 7.5 parts black copper oxide with 2% CMC gum in water
solution. White squares were stuck to blue masking tape on scrap cardboard and
airbrushed with blue bubble paint. Overspray was wiped from edges of white squares
using a paper towel. Each magless was stacked with the painted white layer on
the bottom, thin clear with dragonfly attached, then thin clear as cap. Magless
were fired to full fuse on kiln washed shelf until edges rounded nicely. Minor
points on the corners were removed by sanding lightly on well worn 120 grit
1" X 30’’ belt sander.
What I learned 5%
copper oxide in bubble paint is too light in color, bubbles too small. 10 %
copper oxide in bubble paint color goes toward green, bubbles are too large. Too
much bubble paint produces larger, irregular, unattractive bubbles. Thinnest
layer of Unique clear on copper produces least bubbles over copper. Super Spray
on copper worked sometimes, sometimes not.
Pictures of
steps in production will be posted at www.photos.yahoo.com/tomwhite2 in the magless 2005 album when I have time to
upload them.
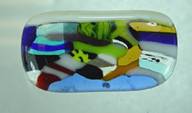
I call this technique "reversible".
It's a different color on each side, but a clear something running through the
middle. I would (but haven't) used this on a floral former where the outside in
say Blue and the inside is maybe yellow but with a cathedral of some sort
(clear for me) running through the middle. It's done by cutting 1/4" strips
of two different colors. The bottom layer is stacked flat (not on edge) in
stripes with say a black strip placed next to a white strip such that it looks
like this [!|!|!|] where !=black and |=white. I used some scrap Spectrum for my
exchange pieces. The middle layer is random sized clear strips and some mardi
gras noodles I had placed perpendicular to the bottom strips. The third or top
layer consists of like color strips on bottom. These were then fully fused.
When fused, I cut
the strips on a tile saw such that each bar had one side green and the other
orange (I think - I don't remember what color glass I used [just remember not
liking the colors real well]). I placed the bars such that the green side was
on the bottom and orange on top. Fired again to full fuse. On quite a few, I
varied the layout of the 2nd firing. After 2nd firing, I cut the bars to
exchange size.
It amazes me just
how much loss there is when doing pattern bars. I'd estimate that you lose
close to a quarter of your original brick size. When doing multiple firings and
tile saw cuts, the loss is incredible. I knew this before I did the squares,
but still didn't plan well enough. What I learned was no matter how well you
think you calculated quantities for pattern bars, always add much more to
ensure you'll have enough.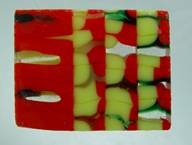
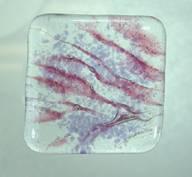
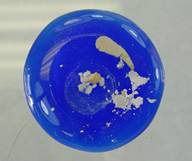
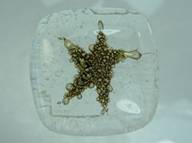 Tofino Art Glass,
My magnet this year is an exploration of the reactions of
thin Brass Shim Stock QQ-B-613 B (1/2 HARD) made by Lyon Industries. It
was 001” / .025mm in thickness. It is available from Lee Valley Tools in
Canada. www.leevalley.com Do a site
search for “brass shim stock” and it will take you to a page with all the
varieties that they carry. That company is set up to do international
mail order and pricing in your currencies. If you don’t know Lee Valley,
it is a tool user’s paradise with custom made for them only items.
I consider the maglesses in my studio to be paper weights
and/or worry stones and sell them as that. The top side is fire polished
while the bottom is textured.
I exacto cut the brass starfish using an ART Exacto snap off
type blade, the best blade for cutting papers etc. and placed them on top of
the bottom layer of a six layer stack of 1” square Bullseye Tekta tiles. If
your blade is not sharp and you are not using a green type self-healing cutting
mat under the brass, the brass will tear rather than cut. Scissors will
work too, but you have to be extremely careful handling the brass for the edge
of the roll is razor sharp and will slice your hand instantly if you are
careless. Do not forget that warning, as I will not be held responsible
for hospital bills.
Last year, I gave a sample of the decals I used for my
maglesses. This year, I would have loved to have provided a sample piece
of the brass but because it can cut you so easily, I didn’t.
I observed wonderful brass bubble patterns in some trial
pieces that I made. Their beauty, magnified by the stacking of the layers
of glass made me want to explore how to get the bubbles consistently over the
entire starfish. Unfortunately I have not come up with a fool proof
system of ensuring that the bubbles do their bubble thing every time. I am leaning
towards having to clean the brass or dirty the brass before cutting it up but
those experiments will have to take place later. The magnets had to be
shipped. Many a time the starfish would come up with only a very
few bubbles or none at all. Many were not shipped as a Magless as I did
not think they were good enough to be included. I have explored the
placing of the Tekta smooth side to smooth side, texture side to texture side
etc. in the hopes that air or lack of it was a factor in the bubbles.
I have even gone so far as to observe that Tekta has a linear micro pattern on
its surface and place those at right angles to each other. It made no
difference. The brass does its thing. However when you get one of
the starfish to become completely covered with shiny bubbles studio customers
will always be attracted to them and buy them first (at $10Cdn Yet!!!!) before
buying another starfish, one made with brass wire and filled with coloured
frit.
Firing schedules etc. you will have to figure out for your own
kilns, it is hold them until the stack flows but not too much.
So what I learned was there is a lot to learn about brass
and how to work it but not how to guarantee the results. I also learned
that 6 layers of the Tekta seem to work the best for me.
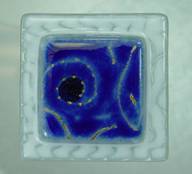
81 Heidi Crowley
 White over clear
base. Transparent Blue and Clear noodles and stringers on top. All
System 96 glass. I used a simple repeating pattern I've had in my head
for a while.
White over clear
base. Transparent Blue and Clear noodles and stringers on top. All
System 96 glass. I used a simple repeating pattern I've had in my head
for a while.
What I Learned: Only after committing to and
beginning production of a so-so idea (too late to start anew) will the
creative brainstorm hit. Good news is I've got a year to perfect it!
 I used Spectrum 96 clear
and Spectrum 96 Cobalt Blue (both 3mm). I cut the clear for the bottom
layer 1 1/4" sq. and the cobalt blue 1/16th of an inch larger for the top.
I used Spectrum 96 clear
and Spectrum 96 Cobalt Blue (both 3mm). I cut the clear for the bottom
layer 1 1/4" sq. and the cobalt blue 1/16th of an inch larger for the top.
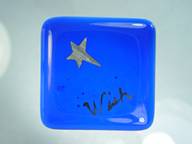
The stars are made of Precious Metal Clay, in
the paper sheet form and punched out with a paper punch. The word
"Wish" is written in White Gold ink.
Every magless magnet was assembled with
stars and written on and then fired.
They were fired in my Olympic oval kiln,
48" x 36" making a one firing event. I fired at 400 dph to 1250
degrees, hold for 10 minutes, afap to 1450 degrees, hold for 10 minutes, afap
to 960 degrees, hold for 30 minutes and off.
The stars all needed to be burnished to remove
the haze from the binder and water burn-off that is part of the Precious
Metal Clay formula. The final results are Fine Silver Stars.
Normally PMC paper needs to be fired to 1470 degrees and held for 30
minutes. This was a real test to see if it would work at only 1450
degrees for 10 minutes. It worked!!!!!!!!!!
Also the White Gold ink should only be fired to
cone 019-018 on the directions (approximately 1350 degrees) and that worked
too!!!!!!!!!! Of course I did a "test" magless magnet first
before I ran all 108.
Hope you all enjoy and continue to "Wish
upon a Star".
 Start
with thin black & clear. Cut 3 pieces of each, roughly 4" x 16".
Uncork tubes of dichroic stringers (black), 2m black stringers and 2 tubes each
of 3mm & 6mm Sizzlestix (black). Use lots of Bullseye Glastac to build 4
striped glass quilts on thin black, randomly placing Sizzlestix with
interspersed black stringers. Break up lots of dichroic stringers and, using
tweezers, place them dichroic side up in what appears to be a random pattern of
"pick-up-sticks." Go blind trying to find the dichroic side, but do
your best to ensure relatively even coverage. Lots more Glastac at play. Cap
with clear. Full fuse. Open kiln and discover stringer bits near the edges have
escaped and leapfrogged across the shelf. Take out the lapidary saw and cut,
cut , cut, cut.... and cut some more. Get wet, go deaf and get hand cramps.
Soak. scrub. Rinse. Clean again. Full fuse. Open kiln. Oops! Learn that some
flip, some jump, some break ... and, in the process, some become joined at the
hip, or corners in this case. Count the successes and discover you're now short
by 5, although you started with 7 extras. Scream a few of George Carlin's
infamous seven. Take a breath. Have a drink. Go back and start again, making
one more quilt...
Start
with thin black & clear. Cut 3 pieces of each, roughly 4" x 16".
Uncork tubes of dichroic stringers (black), 2m black stringers and 2 tubes each
of 3mm & 6mm Sizzlestix (black). Use lots of Bullseye Glastac to build 4
striped glass quilts on thin black, randomly placing Sizzlestix with
interspersed black stringers. Break up lots of dichroic stringers and, using
tweezers, place them dichroic side up in what appears to be a random pattern of
"pick-up-sticks." Go blind trying to find the dichroic side, but do
your best to ensure relatively even coverage. Lots more Glastac at play. Cap
with clear. Full fuse. Open kiln and discover stringer bits near the edges have
escaped and leapfrogged across the shelf. Take out the lapidary saw and cut,
cut , cut, cut.... and cut some more. Get wet, go deaf and get hand cramps.
Soak. scrub. Rinse. Clean again. Full fuse. Open kiln. Oops! Learn that some
flip, some jump, some break ... and, in the process, some become joined at the
hip, or corners in this case. Count the successes and discover you're now short
by 5, although you started with 7 extras. Scream a few of George Carlin's
infamous seven. Take a breath. Have a drink. Go back and start again, making
one more quilt...
 After
coming home from Corning, I wanted to start experimenting with some
After
coming home from Corning, I wanted to start experimenting with some
of the techniques
talked about in the warm glass sessions.
I want to explore
fluidity in glass or maybe the illusion of movement. I liked the granular
effect of pate de verre so I thought I would try to develop that look from
cranberry frit and Gum. I bought an egg mold and experimented with casting frit
into the 25 egg molds in the tray.
I needed to let
the frit mixture dry before firing; I thought it helped the granular effect. I
fired up to 1325 degrees with 20-minute holds and 300-degree ramps. The firing
process was 11 hours and 20 minutes long.
The one vessel
that is for the silent auction is still in its natural state; all others I
coldworked or grinded the edges to create more of an oval look.
What I learned:
The first batches
of vessels were very light and holy; which I really liked but they were too
fragile to ship and display. So I began to thicken the mixture as well as mold
the frit thicken within the egg molds.
(I thickened the frit mixture and also thickened the amount of frit
mixture in the egg mold. I used more frit in the gum mixture and then added
more layers of frit mixture to the shape of the mold.) I lost the clarity of the vessel; although it
was a stronger piece. I hope you receive one of the first vessels; although
they are not as sturdy; they have a more crystalline effect and well as more
pristine color. What I want to do is to refine the fragile pieces to receive
the strength but carry the light and granular sparkle. The granular is the
piece inside of the egg mold; so you would need to turn the vessel over. I
didn’t place anything inside so the front of the vessel has the shiny gloss of
kilnwork.
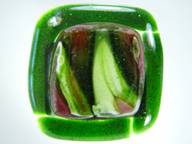 from
from
Glass
Used: Bullseye: Light Aventurine Green
Spring
Green
Pink
Deep
French
Vanilla
First
I cut strips Bullseye glass to be used for combing. Then, with my husband’s
cooperation (holding open the kiln lid, telling me when the handle was on fire,
etc.) I proceeded to come up with the center part of my maglesses. These were
fired in an Olympic digital pottery kiln.
Then using a tile saw, I cut many, many, many, very uneven rectangles.
(I was going for square pieces) Then came a lot of grinding since I can’t seem
to cut a straight line. Using a strip
cutter, I cut the edges for each magless. These were placed on a clear piece,
before loading in the kiln. The nice
thing about my maglesses is that the back is almost as cool as the front. In
order not to go to a lot of expense, I used what glass I had on hand, which
included some iridescent aventurine green.
I didn’t think the iridescent would work with the combed piece, so the
irid part is on the back. Turns out it wouldn’t have been so bad.
What
I learned: Shelf supports are VERY
Important! During the combing phase of
this endeavor, some of the kiln posts fell over and the whole shelf dropped
down about a foot. Luckily, the shelf
ended up level, but in the bottom of the kiln, making the insertion of a wooden
broom handle difficult to say the least.
I learned that the more
times you fire dichroic, the more tiny pieces of dichroic coating comes to the
surface making tiny "dimples" which need to be ground off. I
always fire with the dichroic coating facing "down". I
expected that some of the coating would come to the surface. I was just
surprised when with each additional firing tiny pieces of the coating continued
to surface making additional grinding necessary.
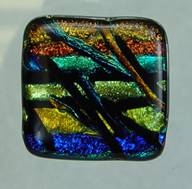
 How to:
Ingredients:
* 3/8" strips of 90 COE
cathedral colors (spring green, forrest green, black, amber, light yellow, neolavender,
darker blue -- whatever looks yummy)
* 1 1/2" strips
of ripple dichro (Dichro Magic scrap -- can you believe they call that scrap?)
* 1 1/2" squares of
clear and white opal
Chop, chop, chop, forever. Use nippers to chop up the
3/8" strips into teeny little rectangles for the mosaic middle
sections.
Cut dichro strips for magless sides (approximately
1/4" wide). On the kiln shelf, lay 2 strips of dichro about 1 inch
apart. Fill in center with cathedral chips. Cap with clear square.
Repeat 110 times, give or take.
First Firing: Hot box on high ~32 minutes, or once
sense kicked in, to 1450 in the big Evenheat at the glass shop.
2nd Firing: Place dichro/cathedral square on top of white
opal square -- fire to 1425.
Cold work -- most of them needed this, and then fire polish
What I learned:
1) It helps to be insane before you start
this. That way, you won't miss your sanity when you lose it in late January,
crouched over a kiln shelf, putting teeny little glass chips one at a time in
their proper position in the dichro sandwich.
2) Never underestimate the value of your
friends at the glass shop (Art Glass Fusing Center, Austin TX --
saints).
3) This could have been way easier if I had
thought of it as a production process instead of the individual creation of 106
maglesses. I would have created a sheet of the cathedral chips then
chopped that up, or made long sections of dichro sandwiches (dichro subs?)
then cut them into the magelss lengths.
The little notebook
magless for this year are made from System 96 glass.
For the text printing on
each magnet, a silkscreen was made by a photographic process using a
computer-generated image. The screen had
25 images of the text so
I could screen print 25 magnets at a time on 7
1/2 x 10 inch sheets of
almond color glass. Paradise paints were
used for screening, mixed with Thompson Enamels A-13 medium.
After the screen-printed
images were dry, each sheet was cut into individual pieces.
The small green strip was
added to each magnet and then batches of 36 were fired to tack fuse the strips
and fuse the Paradise paints. The fusing
temperature was 1350 f with a 10-minute hold.
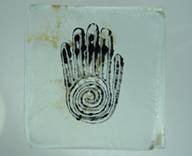
 Greetings from Boise
What I
learned is easy "START EARLY!!!" I had an
idea on what I wanted; Brass hand with the Peace sign. Well 80 plus badly
bubbled pieces later I was willing to scrap the idea and just get them done.
I used
Spectrum glass, with a punched brass or copper insert. Very easy. Base colored
punch topper with clear.
Next year
I have a better idea that is a little more fun. The 100 plus not worth
sending I am going to tile the top of a patio end table so not all is lost. It
was fun and I want to do it again next year. I am new to fusing. I am
a old stained glass and bead maker so this has been a learning experience.
 What we learned and what problems to avoid in the future
First do NOT
completely rebuild the shop from the floor up after you sign up for the
maglesses exchange. It takes 6 weeks out
of production (thought it was fun to watch the concrete workers trying to
smooth the floor with the long handle bull floats in a small space). The shop is one bay of my garage. Then change our minds from the first idea,
because most everyone has done it and try for something else that takes two
hands to work (lots of stringer pulling, cutting and grinding). Finally trip over your own tool box at a show
and dislocate the left elbow and tear up some muscles and become one handed for
several weeks. Back to first idea.
One of
several experiments that Jessie and I wanted to do, was combing of different
combinations of glass and dichroic (lots of folks have done this, but we wanted
to try it). We saved all of our small
pieces of different colors of base glass and dichroic. We bought some colors we had not used before
and we also used the pieces of work that we did not feel were up to our
standards for shows. It was very simple,
put the broken pieces of glass on a well-washed kiln shelf, run up to 1810 open
door (front loader) and comb. Take the
cooled tile and cut into pieces. At this
point we added more dichroic or colored glass and tried different amounts of
top glass and frit. Then refuse. After the second fusing, grind the edges to
square up and then fire polish. As I
said pretty simple most of the glass was DE and CBS.
What we
learned: Dichroic is a very thin coating
and when combing gets pulled down into the glass and disappears. If you put it on the bottom it breaks up too
much before it gets to the surface. If
you pull too hard you can pull up the kiln wash. Different amounts of top glass will give a
variety of depth to the piece. We like
to do the combings (I think it is the random play of colors) and are using this
idea in our jewelry. It was fun and has
led to some ideas to incorporate into our work for shows. Hope everyone had as much fun as we did.
 All glass: Bullseye 3mm
Base: clear 1101 with gold or silver irid coating
Petals: black 0100, chosen for max contrast with the irid
Centers: deep red 0224, chosen because it held its own against
the density of the petals
Glastac used to secure the pieces
Firing schedule:
heated 300 degrees/hour to 550*
heated 500 degrees/hour to 1475 for 15 minutes
crash cool to 1050
kiln cooled to 970, annealed for 20 minutes
cooled 210 degree/hour to 710
cooled to room temp (my kiln takes about 8 hours to cool)
Surprise when opening the big kiln with the full set of
maglesses: the additional time to ramp up or down devitrified the edges
of the deep red 0224. The tests I'd run in my little kiln (which has a 5
inch shelf, and heats and cools much faster) didn't show any devit at all. I
like that it happened, as it went with the gilded borders on the black petals,
defining the center's edges in an unexpected way.
I also note that the silver irid cracked but the gold irid
did not.
*This was my first firing after having moved my kiln across
the Atlantic, so I fired slowly the first 550 degrees to make sure everything
was ok.
I also put an empty shelf above the topmost
magless-filled shelf, to protect them from any ceiling dust/bits. This
provided an insulating layer in regards to both heating and cooling
speeds.
 No fancy technique here.
Made triangular rings of fiber paper, laid small scraps of BE glass,
about 5-6 layers thick, fired to full fuse.
Reused some of the fiber paper, resulting in pieces that were more
rounded or blobby.
No fancy technique here.
Made triangular rings of fiber paper, laid small scraps of BE glass,
about 5-6 layers thick, fired to full fuse.
Reused some of the fiber paper, resulting in pieces that were more
rounded or blobby.
Shaped and
grinded everything with a DiamondMax grinder, and firepolished the pieces
standing up on their sides. Many leaned
over on the second firing, so I reground those until they stood straight
(-er). Signed with oven-curing glass
paint.
What I
learned: I need more equipment! I've managed very well so far with my little
DiamondMax, but I didn't realize until halfway through that the disk that came
with the grinder was such a high grit (260, I think). I really abused it, trying to remove a lot of
glass from so many pieces and my hands were vibrating for days after I
finished.
This was also
a good color exercise for me - because the pieces were so small, I could be
more adventurous in mixing and matching without worrying about wasting
glass. I found several new color
combinations that I'm looking forward to playing with in larger pieces.
97 – No Entry
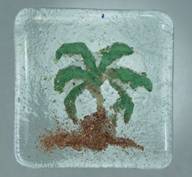
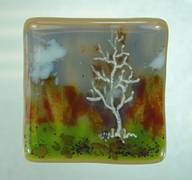
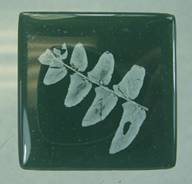 Iridized top glass fired over
leaves, grass, etc so the organic materials burned out completely.
Carefully picked up the top glass so that the ash stayed somewhat embedded in
the glass and placed over a darker base glass and refired. The iridized
surface helped retain the ash and also gave it a silvery look. I was a
little surprised and pleased with that. It was a simple process (which I
always shoot for) that produced an effect that looked more involved.
Iridized top glass fired over
leaves, grass, etc so the organic materials burned out completely.
Carefully picked up the top glass so that the ash stayed somewhat embedded in
the glass and placed over a darker base glass and refired. The iridized
surface helped retain the ash and also gave it a silvery look. I was a
little surprised and pleased with that. It was a simple process (which I
always shoot for) that produced an effect that looked more involved.
What I Learned: Not all leaves are made equal. I
found the woodier (less water) leaves kept their shape but also adhered better
to the irid surface. The fern was superior to the clover, for
instance. The fresh tree leaves I used before Fall were great, but the
dried ones were so "ashy" that they wouldn't pick up with the top
glass. They ended up resembling a "powder wafer" in the consistency,
and I treated them as such when I tried to transfer to the base glass for the
next firing. I like the process and will continue to experiment.
1. Start with a piece of 6 mm (1/4") clear
glass. (You could also use two layers of
3mm -- 1/8" glass. Glass can be any
size that's larger than a magnet.)
2. Put enamels on glass in whatever design you
want. (I used a number of different
brands of opaque enamels, mixing with Klyr-fire if the enamels weren't
pre-mixed.)
3. Fire to enamel maturation temperature. (Exact temp depends on enamels used.)
4. Cut second piece of 6mm (1/4") clear
glass to same size as first piece used, and place on top of the piece you just
fired.
5. Fire to tack fuse. I used 1400F with 5-minute soak. I did not dam.
6. Cut into squares for magnets with tile saw.
7. Smooth edges with wet belt sander.
8. Sign with engraver.
9. Enjoy!
103 Laurie Young
My magnets
were stamped with paradise paints in a Mexican / Mayan motif, then with
confetti and mica powders between layers fused then gold detail fired on.
104 - No Entry
105 Sunlight Art Glass
Click here to see photos and how-to’s for the second group of 35 participants in the 2005 exchange.
Click here to see photos and how-to’s for the first group of 35 participants in the 2005 exchange.