Magless 2005 Showcase
Section One – first 35 participants
 How-to for "
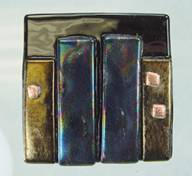
BE 0100 base with
rectangular buildings of BE iridescent
patterned, gold
and silver. Windows are made from
tiny squares of thin
Salmon dichroic glass. Fired 500 degrees
to 1385 degrees
with a 10-minute hold in my Evenheat 2541
coffin kiln.
What I
Learned....
Making strips
stay put while firing can be tricky.... I used Klyr-
Fire to keep the
rectangular shapes in place and allowed them
to dry overnight.
Despite the effort, many of them still shifted
during the
firing. I fired the mags on the old Thinfire (bought
100 sheets 2
years ago and am using ASAP before I buy the
newer &
improved version).... believe the shifting was caused
in part to the
shrinkage of the Thinfire. I also feel that the
black background
is too dark for the final product--if I did this
design again, I'd
use a different color for the background.
Other lesson
learned--don't procrastinate on ideas.... I was #1
to sign up and
probably #99 to get finished...

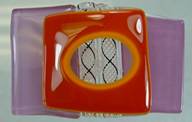
 Using
Morton system, I cut Spectrum system96 iridescent black squares. I used
a small paintbrush to flood a mix of bronze mica and rubbing alcohol in a
roughly shaped square on the iridescent side making sure not to go too near the
edges. It dried very quickly and almost immediately I could use an exacto
knife tip to scratch a morning star design (auseklis) in the mica. Placing
a very small chad in each corner, I covered the square with clear glass.
Using
Morton system, I cut Spectrum system96 iridescent black squares. I used
a small paintbrush to flood a mix of bronze mica and rubbing alcohol in a
roughly shaped square on the iridescent side making sure not to go too near the
edges. It dried very quickly and almost immediately I could use an exacto
knife tip to scratch a morning star design (auseklis) in the mica. Placing
a very small chad in each corner, I covered the square with clear glass.
I fired five at a
time in a small jewelry kiln and a hot start kiln. Once I got the timing
down correctly there was hardly any kiln wash sticking to the backside.
If there was a touch of kiln wash, I used vinegar and time to take it off.
Things I learned:
1. A new kiln, even
with a pyrometer, has a learning curve
2. Pyrometers
sometimes get stuck and I should trust my eyes more than the pyrometer
3. Use lots of
mica... a thin layer looks anemic when fired
4. Over firing, as
when the pyrometer gets stuck, makes the mica disappear in an odd 3-dimensional
manner
5 Nancy
 Glass Orchids,
Frankfort, ME
Glass Orchids,
Frankfort, ME
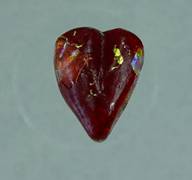
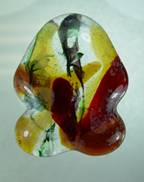
Kiln Cast Hearts for Magless Swap
How to:
I’ve wanted to
play with kiln casting for some time (about 3 years) and the Magless swap is
great because it gives me an excuse to play with some new things and work out
production run bugs. Since the deadline was around St. Valentine’s Day I
decided to practice with a heart motif. I made 3 different small heart
‘sculptures’ using clay dug in Maine. Once dry I used these original
positives to make small clay molds. I simply made some small flat round disks
and pressed the originals into them to form the ‘cavity’. These were dried and
kiln washed. As usual I like to cut whatever corners I can to maximize my time
(aka profit) so I did not pre-fire the molds. I filled them with cullet* and
then fired them at 200 degrees per hour till I reached 600; this allows for any
moisture left in the molds, then I ramped up full speed to between 1505 and
1560 (depending on which kiln I was using) and held form 12 – 30 minutes (again
depending on the kiln).
Once cooled, I
removed the glass hearts from the molds by gently tapping the molds (upside
down) on the table. Kiln wash that had been damaged was re-applied and dried. I
quickly re-filled the molds and stuck them back in the kiln. Once the molds had
been fired once I could ramp up at full speed, i.e. you only need to fire at
200 degrees / hour the first time you fire the molds.
After removing
from the molds the glass pieces were fully cooled. Then I used a grinder to
remove any pickeds (Maine term for widow-makers, i.e. sharp little edges on the
glass). I used my tumbler filled with stainless steel shot (usually used for
polishing PMC pieces) to clean the pieces … lots of them had kiln wash stuck
all over them and I didn’t relish cleaning each by hand.
Now that they
were cleaned and smooth, I fire polished them. After fire polishing each piece
was coated with etching cream to create a matte surface. Because these are to
be used as magnets (or have other things glued to the back) I didn’t want them
to be as transparent as the cullet normally is so I created this matte surface.
This matte surface brings a sort of lovely glow to the pieces.
After a few
firings some of the molds broke and I had to make more. In one week the
elements in two of my kilns went…one Paragon small kiln (second time in 2 months??)
and in my large Jen Ken Oval Kiln… so I had to fire them all in 2 Paragon
SC2’s. I could fit 8 molds in each kiln so could fire 16 at a time…. Still…
this took awhile…. It WAS a lot of fun and I worked out some good bugs in my
process! Happily the element for my large JenKen came today… too late for this
swap but in time for some real production work!!
*Some of the
pieces are filled with crushed dichroic glass and cullet. This is how I will
normally sell them but because I had to make so many in such a short timeframe
I used straight cullet for most. I have included a few random dichroic pieces!
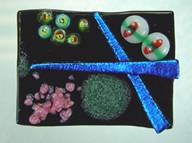
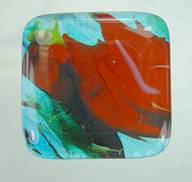
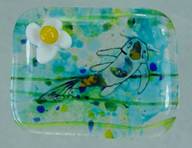 I have
been working on and off around the theme of the sea or water for a while and a
picture of a koi carp in a pond was the inspiration for my magless.
I have
been working on and off around the theme of the sea or water for a while and a
picture of a koi carp in a pond was the inspiration for my magless.
I began by using
some of that green stringer BE glass as a base and added a variety of different
frits to imitate the water in a pond. I fully fused the frit to the bottom
sheet of glass.
Meanwhile I began
the daunting task of painting 110 koi carp onto what would be the capping layer
of glass. I used Reushe fine line black and fired that. Then I painted the carp
in paradise oil based paints (future attempts will be more heavily pigmented -
one of the things I learned while doing this), and fired these.
I fully fused the
two layers together painted side down, and also fused tiny pieces of yellow
sheet to make the center of the flowers to be.
The flowers
themselves were lampworked in Bullseye glass, cleaned and then the final tack
fusing of the flowers to the koi pond was done. It took me quite a few tries to
get the right temperature to fuse the flower without slumping it flat -
something I'd not anticipated having trouble with. My initial tries were not
hot enough to fully tack the flower in place - or hot enough to tack the flower
but not the center ball.
I learned - start
earlier (but then I knew this this time) ... apply the pigment more heavily ...
start earlier ... make more than you need (more than I accounted for since I
ended up using most of the ones I had added to the seconds pile due to the
paint burning out), start earlier ... test more thoroughly in the kiln I would
be using before beginning production, start earlier ...
Actually I am
quite pleased with my maglesses - I was forced to learn to operate my kiln
(something I had nearly given up on - that wretched fuji controller), and to
learn to do some glass painting - something I want to incorporate more of in my
work.
All in all a
great learning experience! Thanks to all who facilitated this event.
7 – No Entry
 My
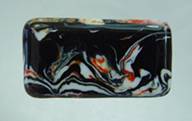
maglesses were made using my favorite technique The Pot Melt.
My
maglesses were made using my favorite technique The Pot Melt.
I arranged strips
of heavily kiln washed firebrick to form a 4" X 8" X 2" deep rectangle
mold. I positioned my pot full of spectrum COE96 glass above the form and fired
away. I had to make three blocks. After they cooled I cut them into 1/4"
slices. I nipped the corners with grozing pliers then rounded them on the wet
belt sander using an 80-grit belt. Then I smoothed the corners with a 400-grit
belt. They were then washed with soap and water, dried, and placed then back in
the kiln for a fire polish.
Things I learned. Don't cut with a tile
saw for three hours in an unheated garage in the middle of January in Wisconsin. Plan ahead
and make them in the summertime.
 1.
Keep an eye on WGBB for announcement to sign up. Almost didn’t get in last
year.
1.
Keep an eye on WGBB for announcement to sign up. Almost didn’t get in last
year.
2. Sign up. Wait for announcement of who’s in and who’s not. Everyone got in –
that wasn’t so hard.
3. Day dream about design. I’m thinking about a pattern bar piece. Maybe a
dichroic accent too.
4. Read rules (well open the web page at least and scroll through it).
Maglesses should be between 1” x 1” and 2” x 2”. They seem kind of adamant
about that. That settles it – I’m making pattern bars 1” x 3” (yea – I’m such a
rebel without a clue).
5. Worked out details of design. I settled on something with an S curve down
the middle early on. Spent a while thinking about color layout. Had originally
intended to include a dichroic design too, but I couldn’t come up with anything
I really liked.
6.
Cut glass strips for pattern bar bricks. I made my pattern bar bricks 6” wide,
10” long, and 1” thick. Glass strips are 10" long (the length of the
brick) and 1/4" to 3/4" wide. I made the pattern bar brick
symmetrical and the width of two maglesses.
7. Tack fused
strips into sub assemblies. The center section (blue, black) was fused as one
flat piece 6” wide. The red, yellow, orange sections were tack fused into
pyramids.
8. Full fuse
pieces from step 7 into a solid brick. Some of the pyramids were placed on the
bottom. The flat black/blue section was placed on top of those pyramids.
Remaining pyramids were placed on top of the flat section.
9. Sand blast
brick (otherwise, areas that had been in contact with kiln wash will not fire
polish to a gloss). Much easier to sand blast whole brick at once rather than
grind edges of each slice later.
10. Cut bricks in
two (bricks are two maglesses wide). Round corners of brick halves (reduces
chipping when cutting slices later). Cut bricks into slices around 1/8"
thick. All cutting of bricks is done with a tile saw using a diamond blade and
water spray.
11. Cut pieces of
clear, and fuse clear caps over pattern bar bottom layers.
12. Bag 'em, box
'em, and ship 'em.
13. Wait for my
box of goodies to arrive.
Lessons Learned
There's a
difference between a Priority Mail shipping box and a Flat Rate Priority Mail
shipping box. Make sure you get the box with "Flat Rate" printed on
it.
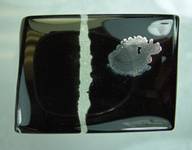
 All the techniques used in my mag
were learned when making Sara's "Cameo" clown. However, because
the flower casting was so thin I had to learn how to get the mold to fill to
the edges. I doubt if my method is the correct but it works for me.
All the techniques used in my mag
were learned when making Sara's "Cameo" clown. However, because
the flower casting was so thin I had to learn how to get the mold to fill to
the edges. I doubt if my method is the correct but it works for me.
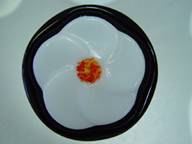
My magless were constructed in three steps. First the
white flower is cast* with BE 0113-01 frit. Second, a 2 1/8" BE
0100-30 circle is kiln carved over a 1/8" fiber silhouette of the
flower. Both of these items are cleaned up with grinders and WBS. Third,
the flower is placed in the kiln carved cavity, fine frit is added to the
center depression of the flower and this is fired to tack fuse (1340 °F in my
kiln).
*Note: There is a great deal of work that went into the
casting process and some difficulties had to be overcome. *I didn't do anything much different than the
standard casting procedure, see below:
1. Sculpt the flower in clay.
2. When dry enough, spray it with clear enamel, two coats,
to seal the pores.
3. Make a RTV cast of the clay. (RTV is Room Temperature Vulcanizing silicone
rubber. I used Smooth-on's Oomoo 30. It's like latex rubber mold
making but much better. Bullseye's Tech Tip #5 deals with box casting and
they recommend a similar product but theirs has a very short shelf life.
This stuff will last quite a while and makes very nice castings.
Undercuts are no problem either since it's stretchy.)
4. Make some resin castings from the RTV. I made
6 or more.
5. Hot glue the resin casting to the bottom of a shallow
disposable plastic container.
6. Mix up a batch of pottery plaster/silica flour, 50/50 by
weight, and pour.
7. When set, demold and air dry.
When I got production rolling I could make a dozen molds
each day. That means about ten days of mold making.
When air-dried the mold cavity is heaped with 20 grams of BE
0113-01 frit. Pressed flat on top. A square of 1/16" fiber
paper is placed on top. Then a square of cutup kiln shelf is put on top
of that as a pressing weight. As the glass melts the weight will flatten
out the back and force the glass to fill the mold out to the edges. There
is a little flash around the edges that is coldworked.
I could fire these a dozen at a time on my 16"
octagonal shelf. That's another ten days of firing.
Meanwhile, I have kiln carved the 2 1/8" round BE
0100-30 backs. The cast flower goes in the cavity, some colored frit is
added in the center and this is tack fused at 1340°F. The tack fuse
temperature is critical. It must be hot enough to stick it all together
but not so hot as to smooth/round off the colored frit. This firing also
gives the cast flower a little sheen and fire polishes the black edges.
That adds up to about a month from start to finish. I
made over 150 of these.
I have pictures of these steps for those interested.
 To
make my magnets I took 1 1/2 inch steel nipples and lined them with fiber
paper. Then I glued a piece of fiber paper to the bottom with a hot glue
gun. They were then filled vertically with strips and/or rods of Bullseye
glass and fired to 1475 for 30 minutes. After they cooled they were
sliced with a tile saw. Then I put on a clear cap and fired again.
To
make my magnets I took 1 1/2 inch steel nipples and lined them with fiber
paper. Then I glued a piece of fiber paper to the bottom with a hot glue
gun. They were then filled vertically with strips and/or rods of Bullseye
glass and fired to 1475 for 30 minutes. After they cooled they were
sliced with a tile saw. Then I put on a clear cap and fired again.
 My magnets are mini sushi plates. I was originally working
on casting with Randy Leachman (#16) and then got into making candy sushi
rolls... one thing lead to another and I thought “hey!! I can make these
out of glass.” so it went something like this:
My magnets are mini sushi plates. I was originally working
on casting with Randy Leachman (#16) and then got into making candy sushi
rolls... one thing lead to another and I thought “hey!! I can make these
out of glass.” so it went something like this:
1. Make a
California roll cane on the torch. Have my husband tell me that the
avocado color is off. Tell him to get a ripe avocado. Compromise
and insert a yellow color to mimic the fish eggs.
2. Make the
Nori wrapped Unagi rice pads by placing the red stringers on the white squares
and draping the green stringers over them. Fire in the kiln till they
look done.
3. Pile
the "wasabi" and the "ginger", made with the BE glue and
fine frit for the wasabi and the med frit for the ginger, onto the plates.
4. Glue
the cut Calif. rolls and the Unagi onto the plates.
5.
Balance the "chop sticks" wherever they fall.
6. Tack
fuse to 1415.
7. Find a
mold that will put a mini curve into the plate and slump to 1150.
8. Have
people guess at what they are.
 I cut my glass from 10mm float glass. The trick to cut small
pieces of thick glass is to cut pieces in half. My pieces are 1.5” x 2” so I
cut 3” strips and then cut them down to 4” pieces and again in half. The next
step was to go over all 8 edges with a diamond hand pad to remove any sharp
edges and to remove “microstarts” Then the pieces were cleaned with Glass plus
and enameled with Ferro Sunshine Series Black. The black is mixed with 1544
water miscible medium, and brush painted on the glass. The glass was then put
in the kiln to dry. Edges were cleaned and then I set them all out and sprayed
a mixture of gold sparkle mica and Ferro flux. The mica and flux were both
weighed out on a triple beam 50/50. I added some CMC mixed in with distilled
water; I cooked the CMC in distilled water until the lumps disappeared. About 1
cup of CMC to 1 gallon of distilled water. This makes a fairly thick solution
that can be diluted later. I mix in “some CMC solution and then add 91%
isopropyl alcohol and a bit of water to get a spraying mixture that is not too
thick or thin. I spray it on with a Badger HVLP spray gun at about 30 or 40
PSI. This dries quickly as it is mostly alcohol. Then I cleaned up the edges
and placed them on shelves. The shelves were kiln washed with Aluchem AC 400
alumina Hydrate mixed with some of the CMC solution and water and sprayed on
the shelf with a Paasche spray gun. I put quite a bit on so that the shelf is
uniformly wet. I either kiln dry this or let it sit overnight. The shelves were
rubbed to remove bumpies and smooth it out. Once the glass was on the washed
shelves, I painted them with Ferro platinum luster.
I cut my glass from 10mm float glass. The trick to cut small
pieces of thick glass is to cut pieces in half. My pieces are 1.5” x 2” so I
cut 3” strips and then cut them down to 4” pieces and again in half. The next
step was to go over all 8 edges with a diamond hand pad to remove any sharp
edges and to remove “microstarts” Then the pieces were cleaned with Glass plus
and enameled with Ferro Sunshine Series Black. The black is mixed with 1544
water miscible medium, and brush painted on the glass. The glass was then put
in the kiln to dry. Edges were cleaned and then I set them all out and sprayed
a mixture of gold sparkle mica and Ferro flux. The mica and flux were both
weighed out on a triple beam 50/50. I added some CMC mixed in with distilled
water; I cooked the CMC in distilled water until the lumps disappeared. About 1
cup of CMC to 1 gallon of distilled water. This makes a fairly thick solution
that can be diluted later. I mix in “some CMC solution and then add 91%
isopropyl alcohol and a bit of water to get a spraying mixture that is not too
thick or thin. I spray it on with a Badger HVLP spray gun at about 30 or 40
PSI. This dries quickly as it is mostly alcohol. Then I cleaned up the edges
and placed them on shelves. The shelves were kiln washed with Aluchem AC 400
alumina Hydrate mixed with some of the CMC solution and water and sprayed on
the shelf with a Paasche spray gun. I put quite a bit on so that the shelf is
uniformly wet. I either kiln dry this or let it sit overnight. The shelves were
rubbed to remove bumpies and smooth it out. Once the glass was on the washed
shelves, I painted them with Ferro platinum luster.
The firing schedule is:
100 > 1000
1.2 hours
1000 >
1140 .2 hr
1140 soak .3
hr
1140 >
1400 .6 hr
1400 soak .9
hr
1400 >
1000 AFAP
1000 soak 1.2
hr
1000 > 900
1.2 hr
900 > 700
.8 hr
700 > 300
.8 hr
The steps of
ramping to 1140 and soaking are in my program so that I can squeeze out bubbles
when fusing. I just adjusted the time for this project. That step can be
skipped without changing much.
One firing; 3
shelves with 40 on a shelf.
The thing I
learned was that Platinum lustre needs a liberal coating. The thin coatings did
not show up with strong metal on them. Gold was much more forgiving.
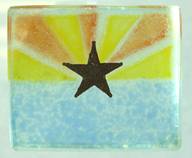
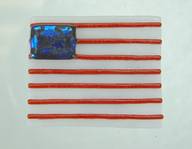 I chose the American Flag for my magless to honor the memory
of my Grandfather, Nicholas Thalassinos, who came to America from Athens, Greece,
when he was only 15, dreaming of a new world of freedom, opportunity, and ready
to do whatever it took to be an American. When I see our flag, I
think of him and all the countless others who came through Ellis Island to make
us who we are today.
I chose the American Flag for my magless to honor the memory
of my Grandfather, Nicholas Thalassinos, who came to America from Athens, Greece,
when he was only 15, dreaming of a new world of freedom, opportunity, and ready
to do whatever it took to be an American. When I see our flag, I
think of him and all the countless others who came through Ellis Island to make
us who we are today.
I
used Bullseye dense white thin glass, cut it into 1" strips as long as the
red stringers. I "glued" the stringers with hair spray,
and moved them around with toothpicks. Let dry overnight. I
then fired these long strips of white glass with the red "stripes" to
a tack fuse.
I
cut the strips down to 1 1/2 inches, attached the blue dichroic
"stars" and fired again to a tack fuse.
I
choose to use the thin glass so that, if you wish, you can put a tie tack or
pin back on the magless and wear it.
Lessons
learned...Not all Bullseye red stringer is red, some is sort of burgundy.
You cannot hear a score on the white glass, but it does break well. Brad
Walker had suggested using a clear fibroid drop the stringers into, but the
lines aren't straight enough in the fibroid!
I hope everyone enjoys the flags as much as I enjoyed making them!
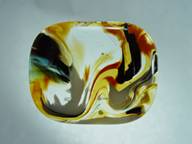
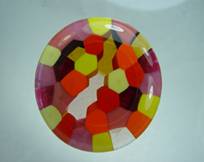
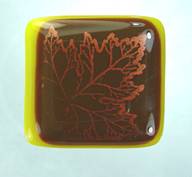
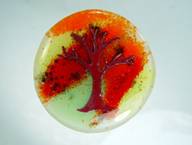 My idea for this
years magless was "autumn". All glass is spectrum 96.
My idea for this
years magless was "autumn". All glass is spectrum 96.
I started with an
almond or white base, then used cherry red, yellow and light green frit. I
sprinkled fusemaster's lime on top of the frit. Next I taped a copper tree
cut-out to the clear cap and placed glass side up on top of frit. I fired to
fuse. Then cold worked each piece and then cooked again to fire polish.
 1. Use cookie cutters to cut into fiberboard. The original shapes were gingerbread men and
x-mas trees. (Keep this in mind when you see them, because that is not what
they ended up as)
1. Use cookie cutters to cut into fiberboard. The original shapes were gingerbread men and
x-mas trees. (Keep this in mind when you see them, because that is not what
they ended up as)
2. Kiln wash
the fiberboard.
3. Use the
scraps of glass left from other projects and fire to 1500.
4. do lots of
cold work (this is where I lost Mary), and decided that arrowheads and little
men were easier than the original x-mas trees and gingerbread men.
5. Fire
polish to 1415.
6. Realize
that the kiln was a bit hotter than I had thought.
7. Remove the
slightly over cooked maglesses and ship off knowing I will do better next year
as I learned what not to do this year.
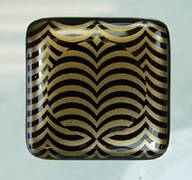
Blasted Glass! Studio
Here’s
the story:
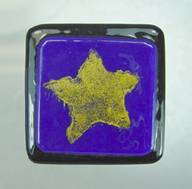
 My
maglesses have gone through three firings. The first was to fuse a base of
System 96 black irid glass on the bottom and System 96 plain
black glass on the top. The irid was placed facing down against the
kilnshelf. A slow ramp from 1150° to 1250° reduced bubbles between the
layers. A full fuse was achieved with a 20-minute soak at 1450°.
My
maglesses have gone through three firings. The first was to fuse a base of
System 96 black irid glass on the bottom and System 96 plain
black glass on the top. The irid was placed facing down against the
kilnshelf. A slow ramp from 1150° to 1250° reduced bubbles between the
layers. A full fuse was achieved with a 20-minute soak at 1450°.
Aztec gold mica from
Sepp Leaf was mixed with Klyr-Fire medium and then thinned
with alcohol and airbrushed on the top of the maglesses. Multiple coats
are required to obtain a truly opaque color. The maglesses were fired a
second time to 1410° for 10 minutes to fuse the mica. The maglesses were
thoroughly washed and dried after firing to remove the excess mica from the
surface.
I created an optical
art pattern using Adobe Photoshop and printed a negative onto Hi-Rez film using
an Epson 1280 inkjet printer. I created the photoresist using Rayzist SR2000
film in a commercial UV exposure unit. The photoresist was applied to the
mica surface. The maglesses were then sandblasted through the gold mica
revealing the black glass.
After washing and
drying thoroughly, I used Hanovia Liquid Bright Gold and a Kemper pen to sign
them on the back. After air-drying, they were placed on a kilnshelf and a third
firing to 1410° for 10 minutes firepolished the black glass and matured
the gold.
As far as lessons
learned, I created a very difficult photoresist pattern for such a small piece.
It complicated adhering the resist to the surface. In retrospect, I would have
changed the pattern to eliminate the numerous open ends to simplify application
and improve the adhesion of the resist.
 I started with Perfect Medium a product made by Ranger. It
comes with a sponge type stamp pad and I dabbed the stamp with the sponge.
Press stamp to glass to transfer the sticky stuff. Apply mica powders with a
small paint brush. Brush off excess with a larger brush. If stamp is smudged
you can touch it up with a wet paper towel or easily clean it off with soap and
water and start over. Take to a full fuse.
I started with Perfect Medium a product made by Ranger. It
comes with a sponge type stamp pad and I dabbed the stamp with the sponge.
Press stamp to glass to transfer the sticky stuff. Apply mica powders with a
small paint brush. Brush off excess with a larger brush. If stamp is smudged
you can touch it up with a wet paper towel or easily clean it off with soap and
water and start over. Take to a full fuse.
I understand you
can also use cheap hair spray as a sticky medium. When I run out of Perfect
Medium I will give that a try.
What I learned -
My kiln is smaller than I thought and I need to start on a project of this size
earlier.
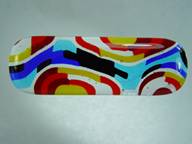
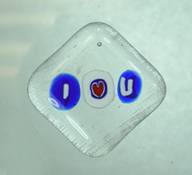
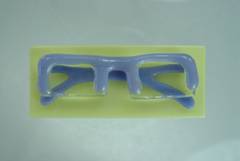 My eyeglass magless are made of
Wasser and BE. I fused the frames onto
the clear lens first (top temp. was 1310), cold worked them and then fired them
again (top temp. was 1315). I fired the
eyeglass arms (top temp was 1310) and the base piece separately (top temp. was
1310 also!). Then I fired the finished eyeglass frames with lens, the prefired
eyeglass arms and the prefired base together (top temp. was 1195). Each magless started out as 12 single pieces
of glass! I hope you enjoy them as much
as I enjoyed making them.
My eyeglass magless are made of
Wasser and BE. I fused the frames onto
the clear lens first (top temp. was 1310), cold worked them and then fired them
again (top temp. was 1315). I fired the
eyeglass arms (top temp was 1310) and the base piece separately (top temp. was
1310 also!). Then I fired the finished eyeglass frames with lens, the prefired
eyeglass arms and the prefired base together (top temp. was 1195). Each magless started out as 12 single pieces
of glass! I hope you enjoy them as much
as I enjoyed making them.
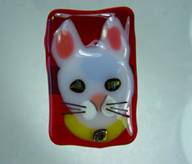
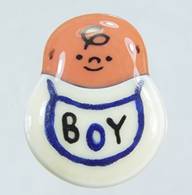
My
Maglesses are reflection of my love for companion animals, a theme that shows
up in all my work. I laid out the pieces for the head, ears, collar and nose on
a translucent base and did a full fuse, 1465, 10-minute hold. The second step
was to add a few more details like whiskers and tack fuse at 1330 and hold for
10 minutes. Because I lacked an innovative technique I tried to make up the
difference by creating a happy design!
 How
they were made
How
they were made
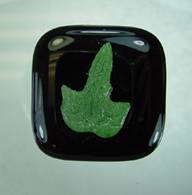
Squares of 2 layers black Bullseye glass approx 1.5 x 1.5 -
fully fused
Cast 150 small leaves from Bullseye powder
Tack-fused leaves to squares
What I learned
Life has a way of getting in the way - start earlier (I say this every
time!)
Glue would work quicker and more consistently than tack-fusing
finished magless’ have a way of walking away to live with friends and family,
next time make even more extras.
 My maglesses are a sample of the inset tiles I do for custom
orders… Which can match sinks or color
schemes…
My maglesses are a sample of the inset tiles I do for custom
orders… Which can match sinks or color
schemes…
They are simple high fire panels cut into squares and refired on
texture cloth to polish.
The tiles sent for this exchange started as a base of aqua with
hammered (broken up with a hammer) frit of various colors and clear.
This was fired to 1725 and lightly combed;
Then the large tile was cut on the tile saw into 1 1/2” squares
And then refired on Lava cloth for a back texture
Nothing earth shattering or artistic per se, but a technique I
have found useful and I hope you can play with…
Magnateers: Linda does have
some great photos of her process, which you can see at http://www.sonic.net/~jayreed/magless.html.
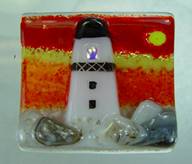 Lighthouses:
·
Cut
2" strips and powder with the 4 different layers of frit, and measure
every 2" to get the sun in the right spot. Fire in the kiln.
·
Cut
the strips into 2 inch pieces. Add lighthouses, light on lighthouse (dichro),
rocks and sand around the bottom of the lighthouse. Fire in the kiln
·
Paint
the windows and tops (using the same paint and methods used hundreds of years
ago). Fire in the kiln
Do this process over and over again for about 120 times!!!!! Have
fun!
Magnateers: Terri does have
some great photos of her process and maybe if you ask real nice she would email
them to you!!
 Copper screen float glass
fused to 1370f. Brass shim stock float glass fused to 1370f. There are some
other ingredients that I do not want to share at this time. What I learned;
what a big difference a few degrees make when fusing to retain texture. I have
a whole new series of pieces planned based on metals and glass. I think I will
add enamels to the mix as well.
Copper screen float glass
fused to 1370f. Brass shim stock float glass fused to 1370f. There are some
other ingredients that I do not want to share at this time. What I learned;
what a big difference a few degrees make when fusing to retain texture. I have
a whole new series of pieces planned based on metals and glass. I think I will
add enamels to the mix as well.
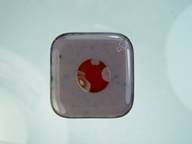
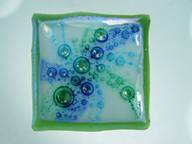 'I got Bubbles!'
All glass is Bullseye
Inspiration - all those 'help - I got bubbles, what did I do
wrong?' postings on the board.
For each magless I cut 4cm squares out of thin white and
clear, and a 5cm square of regular iridized turquoise or olive green or aqua
blue.
I mixed 'bubble powder' in green, turquoise and aquamarine
with water to make creamy paints.
I painted the white squares with a variety of patterns,
placed the irid square on thin-fire paper irid side up, then the prepared white
square capped by the clear.
I fired the maglesses to 840 deg Celsius with a 10-minute
hold.
Some maglesses went through the process again, with another
layer of bubbles and glass - these have a distinctly bulbous look about them,
and more depth of colour. These were the ones I didn't put enough paint on
for the first firing, and had come out with too few bubbles.
Lessons Learned
Bubble powder dries very fast. Dried up paint left in the
jar can be re-mixed with water after storage to no ill effect.
The consistency has to be just right - too wet or too dry
gives few very small bubbles - too thickly painted and the bubbles are too big
and wouldn't have survived transit.
I used iridized glass because at the time I had a lot
of scrap pieces to use up - with hindsight they may have looked better fired
irid down.
The powder can be sprinkled on dry too, giving spectacular
bubbles if used thickly enough.
UK supplier info - I got the bubble powders from Creative
Glass in Kent.
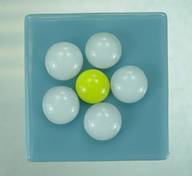 Instructions:
1. Petals: Cut
out hundreds of .3” squares of white irid and an equal amount of .45” squares of
clear. Stack clear pieces on top of irid pieces and heat to full fuse and hold
until they are rounded. I didn’t worry about annealing since the pieces were so
small.
2. Flower
centers: Cut out .3” squares of yellow opal. Heat to full fuse until rounded.
3. Backgrounds:
1.5” squares of Alpine Blue.
4. Assembly: I
used diluted Elmer’s Glue to affix the centers and petals to the backgrounds.
5. Firing:
(System 96 glass)
DPH Temp (F) Hold
300 1000 0
2000 1350 0
AFAP 1000 0
300 960 20
200 800 0
400 120 0
Lessons learned:
Whiteq irid is
not a wise choice for pieces that small. It’s very hard to tell which side is
the irid side. My eyes are still crossed.
There was about a
3%q failure
rate for the petals. That is to say that no matter how carefully the clear
pieces were placed on the top of the irid pieces, a few of them slid off to the
side really badly and couldn’t be used. I normally make the top pieces the same
size as the bottom and I almost never have a failure. Lesson learned: If it
ain’t broke, don’t fix it!
There is also
about a 2-3% failure rateq for the
completed magless. For some unknown reason some of the petals seemed to just
move around during the firing.
When you plan on
making some extrasq just in case
– double the amount of extras.
 From Mt. Airy, Maryland
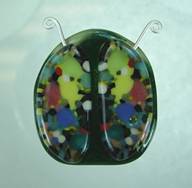
Buggerfly How-to
I made the
buggerfly's wings out of sliced, 1/2 round pattern bars. The bars were made
with Bullseye stringer and rods, in a bisque ware "olive tray" that I
purchased from one of those walk-in, paint-it-yourself pottery shops (in my
case it was an "I Made This!" store). Each olive tray was about
14" long and about 1.5 inches in width, with a round bottom. I cut off
both ends to leave a "U" shaped mold, applied kiln wash and filled it
with various sizes/colors of stringer and four or five rods, cut to fit
lengthwise. Dammed the ends of the mold (four of them) and fired:
500 dph to 1100
deg. F, hold for 10 minutes
AFAP to 1500 deg.
F, hold 15 minutes (take a peek)
AFAP to 960 deg.
F, hold for 3 hours (being cautious!)
60 dph to 720 deg
F, no hold
Off
Once cooled, each
bar was cut using a plain old tile saw from Sears, then fire polished at 1350.
110 round-ish
bodies were cut out of 3mm BE aventurine green, ground and fire polished
(1350).
220 1"
pieces of fine silver 18g wire were cut and a tiny loop was made in one end.
Last minute
emergency - after cutting all the pattern bars that I made (4 - 13" bars),
I found that I was 11 pairs of wings short, so I had to make and slice one more
bar! Used these in their un-fire-polished state and they came out fine.
Assembled all on
the shelf and fired:
500 dph to 1100
deg. F, no hold
AFAP to 1410 deg.
F, hold 10 minutes
AFAP to 960 deg.
F, hold 20 min
Off
Lessons learned:
1. Separately
fire polishing individual components that will be fired together later is
unnecessary, at least for this project.
2. Fine silver
leaves a nice stain on the glass.
3. The MK saw
blade that I used to slice the pattern bars removes an immense amount of glass
between slices - I was surprised that I had to make a fifth bar!
4. Fooling around
with placing tiny pieces of wire between two pieces of glass is very difficult,
tedious and was the hardest part of the whole endeavor!
5. I had a blast
doing the project and can't wait for next year!
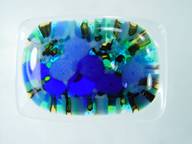 My mags this year
consist of pattern bars made from stringers and rods.
My mags this year
consist of pattern bars made from stringers and rods.
I made channels on my shelf using cut up pieces of other shelves
and wrapped each with shelf paper. I then filled each channel with various
shades of stringers and a few rods. Fired up the kiln and fused.
I then sliced up
the bars using a tile saw and fired each of the pieces on a piece of clear
Bullseye to give them a small frame. (note to self...DO NOT use a tile saw when
the temp. is below freezing in your shop, icicles WILL form from the
spray...BRrrrrrr). I did not let my mags
fire completely flat because I kind of liked the 3-D/ Kaleidoscope effect it
has.
 The first year I did
frit.
The first year I did
frit.
The second year I
did combing.
The third year I
did inclusion.
This year I did 2
pattern bar sections on a white base.
My maglesses are
simple, as am I.
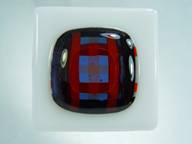
 These were built in layers. I've
been doing lots of very thick pieces out of float and was investigating how to
incorporate colors into these pieces. I found an old 1/4" dining room tabletop
in a yard sale and was looking for a good use for it.
These were built in layers. I've
been doing lots of very thick pieces out of float and was investigating how to
incorporate colors into these pieces. I found an old 1/4" dining room tabletop
in a yard sale and was looking for a good use for it.
I made 3 masks, one for each color, on the computer. Printed
off on a single sheet of paper, there were 35 maglesses on each sheet.
I then cut 3 pieces of paper sheet sized glass, and sifted
red powder, orange powder, and blue frit Bullseye glass on each sheet
separately. Each sheet then was fused separately because during prototyping, I
found that the colored powders were spread out too much from the weight of the
sheets on top blurring the patterns. The schedule was:
300 1430 15
9999 1030 20
100 900 0
200 700 0
off
Each sheet was then stacked and fused together to form a
3/4" thick sheet of glass. The schedule was:
100 1150 30
50 1250 0
500 1420 15
9999 1030 120
40 900 0
80 750 0
150 500 0
off
This developed an enormous amount of devit on the surface.
Sandblast, coat with borax, and refire. The schedule was:
100 1450 10
9999 1030 120
40 900 0
80 750 0
150 500 0
off
Each thick sheet was then cut apart on a tile saw, flat edges
smoothed on a lap wheel, and all edges beveled on a wet belt sander.
Another star mask was made, and gold luster was applied
using a kemper pen through this mask. They were then fired to cure the luster,
then fire polish the sides. The schedule was
250 1150 15
2000 1320 15
9999 1030 30
100 900 0
200 700 0
off
Repeat 3 times to get enough completed maglesses to ship.
What I learned
1: Prototyping sometimes doesn't bring out the problems show
up when producing in bulk that aren't present in onesies or twosies. For
example, when producing items in a large sheet, bubbles form more easily in
between layered glass than when producing small numbers at a time.
2: Bullseye powder frit can be used with float without too
much problem, whereas frit can't. Notice on my maglesses, the orange and red
color doesn't cause crazing, whereas the one step larger frit does. This was
caused by the different COE, and I expect that in 1000 years, my maglesses
won't be in one piece. Please plan your wills accordingly.
3: Float glass can devit a lot, sometimes even through a
light coat of borax, and maybe not on the first firing. I found that I had to
heavily apply the overglaze to prevent this.
4: The schedule for thick glass can take a long time. Since
my electric rate is far less during off-peak, I fire only at night or on
weekends. Count weekends and firings to determine starting date for future
exchanges.
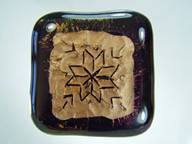
 Goal:
fine-tune firing temps so that defined edge is maintained, check
Goal:
fine-tune firing temps so that defined edge is maintained, check
colors for ability
to accept a paint-on and bake paint.
Materials:
BE Black and
either the teal green that strikes or cobalt blue .. None of
the glass had
numbers - sorry!
Pebeo
Porcelaine150 paint, star stencil, foam dauber
Procedure:
Cut 1 7/8"
black square, cut ~1 1/4" teal or blue square for topper.
Fuse: 650 DPH to
1330, hold 20 minutes, cool AFAP to 1100*, cool to
300*, crack the
door to peak! Let cool to room temp.
Cut star stencil
from Mylar, use tacky adhesive, apply to tiles, daub
Porcelaine 150
paint with the dauber. Let dry at least 12 hrs. Bake at
350* for 30
minutes.
Use sanding pad
to smooth bottom and edges.
WHAT I LEARNED:
Blue and teal
mature at slightly different temps.. Fire separately.
The Porcelaine 150
likes a surface with bite and was a challenge
to apply to the
shiny blue tiles. It was easy to apply to the teal
which struck to
slate. This strike was intentional!
I have used the
Porcelaine 150 paints in test situation
for > 1 year
and have not seen fading or loss of paint through
many dishwasher
loads. I have projects where the ability to
apply after fuse
is a necessity.
I am pleased with
the tiles. I got answers and results that
I wanted. I
learned that a light touch with BE makes for less waste!
Next time: fuse
colors separately, try a silk-screen for images,
use a fire-in
paint, or sandblast the image area and then apply the
Porcelaine 150
 A piece of cake
Recipe
sheet and cooking instructions
Ingredients:
Bullseye translucent sheet glass, frit, shelf
primer
Procedure:
Take half a sheet of translucent glass and
sprinkle liberally with fine coloured powder, taking care to sift lightly and
evenly to a uniform thickness over the surface of the base glass.
Carefully take the sheet to the kiln and gently
lay the sheet onto a prepared shelf.
Cook at full fuse for 5 minutes or until the
powder is fully melted onto the base glass, depending on your oven.
Allow to cool as usual, paying particular
attention to annealing because the sheet has to be cut when it is cool, and
then some.
When the sheet has sat for a while and become
accustomed to its’ new form and place in the scheme of things in the pattern of
the universe, the sheet can be cut into portions.
Grind the edges of each portion until straight
and vertical, rounding off the corners.
Prepare the cherries by cutting 6mm wide strips
and then junking off each piece, 6mm long to make sufficient number of
cherries. Place on the oven shelf and
fire at full fuse for one minute, or until sufficient time for the surface
tension to pull in and make a nice little round shape.
When the cherries have cooled, put the cakes
back in the oven and place a cherry on the top and precisely in the centre of
each cake.
Heat in the oven to polish the sides of the
ground edges, this will also be sufficient heat to fuse the cherries in place.
Serving
suggestion:
Cut magnetic sheet to size and affix with
double-sided tape to the back of the piece of cake.
What I
learned from the process;
Now that I understand the process, I
wanted to approach this particular project on a production basis.
Starting from a design specification and ending with the mailing and write-up.
I learned from the evaluation of
comparing the plan with the result.
I learned to make a volume of glass to a design
specific.
I learned to prioritize and plan the production
schedule along with regular (pay the bills type) work.
The whole project was a valuable learning
experience.
Click here to see photos and how-to’s for the second group of 35 participants in the 2005 exchange.
Click here to see photos and how-to’s for the third group of 35 participants in the 2005 exchange.